Wednesday 19 October 2016

HOW TO: ANDROID TOOLBAR TUTORIAL

Hello Guys,
This is my first article. I hope that you guys will like my posts and benefit from them.
In this article I’ll be showing you how to create a toolbar for android apps. I will only be using Android studio for this.

What is a toolbar?


You can consider the Toolbar as a customizable Actionbar where you can change its width, height, color, text colour, padding and gravity. Just as in an Actionbar, you can add actions and icons to the Toolbar. A Toolbar is much better than an Actionbar, for it gives the developer more access to control his App Design .

Toolbar types


As I said, everything in a Toolbar can be customized. These pictures provided by Google show how a Toolbar  can be customized.
Android Floating ToolBar example

Android ToolBar example
for more, click here.

How to add a toolbar to our app


Now lets see how to add a Toolbar to our app. All you need is Android Studio or Eclipse (I am using Android Studio).

What will we do?


  1. Use the  Theme.AppCompat.Light.NoActionBar  to prevent the system from showing the action bar.
  2. Define the app_bar.xml that has the ToolBar.
  3. Use <include> in your layout to show the toolbar.
  4. Instantiate the ToolBar by adding findViewById in your Activity.
  5. You need to call setSupportActionbar() and add your toolbar inside to replace the ActionBar with ToolBar.

So lets start!


  1. First, you need to prevent  the system from showing the Actionbar  in your app. So go to ‘Styles.xml’ and change the theme to
<style name="AppTheme" parent="Theme.AppCompat.Light.NoActionBar">

  1. Second, we need to create a new Toolbar layout file for the toolbar dimensions, color, and id.
To create a layout file, under layout directory, right click it >>new>>layout resource file and name it as ‘app_bar’ and change the root element to Toolbar. Now, you may get an error in your ‘app_bar.xml’ at <Toolbar ….>. To fix this, replace ‘<Toolbar>’ with ‘<android.support.v7.widget.Toolbar  …>’ and change the ending part to ‘</ android.support.v7.widget.Toolbar  >’. Now clean project by pressing  CTLR+ALT+L and the error should be fixed.
  1. Third in app_bar.xml, be sure that the width to ” match_parent ” and height to “wrap_content” .
  1. Fourth In activity_main.xml, we must add the toolbar to our activity ,to do that  add the following
<include>
layout="@layout/app_bar"
android:id="@+id/app_bar"
</include>
and hit CTRL+ALT+L to clean your preoject
  1. Now lets move to our MainActivity
In MainActivity.Java we need to tell android that “Hey! I am not using your Actionbar anymore. Rather, I am using my own ToolBar!”. To do that you must make a variable for the toolbar. So add  private Toolbar toolbar; .
Now under OnCreate Method write the following:
toolbar = findViewById(R.id.app_bar);
setSuppotActionBar(toolbar);
To customie your ToolBar you can change its color by changing the background color in the app_bar.xml,also you can add icons and components in the ToolBar(the ToolBar i considered as any other component so you can put stuffs above it or anywhere.

 Errors that you may face:


So by this we completed our Tutorial and you got your Actionbar working. Here is a list of errors you may face when adding Toolbar:
1. When creating toolbar layout resource file  you may get an error in your app_bar.xml at <Toolbar ….> , to fix this replace “<Toolbar> ” with ” <android.support.v7.widget.Toolbar  …>” and change the end to “</ android.support.v7.widget.Toolbar  > “  . Now clean project by pressing  CTLR+ALT+L and the error should be fixed.
2. When adding
 toolbar = findViewById(R.id.app_bar);
setSuppotActionBar(toolbar);
to MainActivity.Java you may get an error. To solve it import the toolbar to your project by adding this:
import android.support.v7.widget.Toolbar;

Complete!


Now your ToolBar should be working perfectly.I hope you guys liked this Android ToolBar tutorial and found it helpful. Please be sure to follow our website. Peace!

251INR WORLD’S CHEAPEST SMARTPHONE TO HIT INDIA (3.67$!)

Is it possible to find a smartphone sporting a 4 inch display, running Android 5.1 Lollipop, having WiFi, Bluetooth, a 3.1 rear camera and a 0.3 front Camera, a 1450 mAh Battery and one year warranty, for a price tag of 3.67$? That seems to be impossible. But not in India! A new smartphone, that may be considered as the cheapest smartphone worldwide, is going to hit the Indian markets in less than 2 days, Ringing Bell’s ‘Freedom251’!
The Freedom 251 aims to be a smartphone which anybody can buy. But it’s not just any other cheap smartphone. This smartphone has great features concerning to it’s price, which is 3.67$ or 251 Indian Rupees. Sweet!

Design


This smartphone borrows a lot of it’s looks from the iPhone 6. It has a round home button, curved edges, and the camera is positioned at the top right along with the flash. The Freedom 251 will have a 4 inch qHD IPS display (a resolution of 540 pixels by 960 pixels). Which is the nearly same size as the iPhone 5/5S, so you will not find a lot of difference in size as we were expecting for the price.Freedom 251

Camera


The Freedom 251 packs a 3.2MP rear camera with auto focus, and a 0.3 MP front camera for your selfies. The rear camera will hold up okay, but the front camera seems to be of a very low resolution. We’ll have to test that to see if it’s practically of any use. It will capture a few details in your rear shots, while the front camera might just barely get the job done. No complains though, for the price, we were not even expecting any second camera on the device.

Performance and Storage


The 251 rupees smartphone comes with a surprising 1.3GHz Quadcore processor which will be sufficient enough to give smooth and responsive performance, they claim. 1 GB RAM will be coupled with the processor to make sure that there is no lag at least when lightly using the phone. It comes with 8 GB of internal memory. More you ask? No problem! It supports up to 32 GB of expandable storage via a microSD card!

Battery


On paper, it has a 1450 mAh battery which we think is enough to last you a day or more, as the phone is not resource heavy. Quoting; “With 1450 mAh, you will not need to worry about running out of power! Talk, text, play and do whatever you want !”
We’re going to post a device review once we get hands on this device and get enough time to play and test it. Let us know in the comments what you’d like to know about the device so we can cover up all the things you need to know in the review!
Well that’s it! That’s what a 251 Rupee smartphone can do! So before you decide to have a launch at a local fast-food chain, think well about what can be done with that money!

Thursday 13 October 2016

How To Install TWRP and ROOT S7 EDGE SM-G935F/FD/X | SM-G935K/L/S | SM-G935W8 |Exynos


After the Note 7 has been exploding widely and Samsung stop manufacturing more from it people went to get the previous phone from Samsung,S7 Edge.So I made this tutorial to benefit you guys and guide you to the right way to root your S7 Edge!

After I tried many ways to root my phone and got stuck at some,bricked at another,and boot-loop on some I wen to search more and more until I tried this method last night and got my phone rooted in about 5 minutes!!

No No No I didn't use any of those funny one click root apps,I just flashed TWRP using ODIN then flashed the SuperSU from the recovery !!

Please do not do anything from your mind,watch the video to know how to to that because Odin is usually dangerous! 

WARNING #1: Flashing a custom recovery to your device will trip the Knox warranty bit on your phone. Check with your mobile provider to see if they will still cover warranty on Knox bit triggered devices. If you understand this risk, continue on.
You generally don't have to worry, as it's incredibly hard to brick a Samsung device, and physical damage warranties should be exempt from Knox triggering.

WARNING #2: The Galaxy S7 stock boot image has dm-verity, which prevents you from booting if you swipe to enable system modifications!
SOLUTION: Follow the full rooting steps below, in order, to allow system modifications without the risk of a boot loop!


Don't forget to subscribe and like


Downloads


TWRP for hero2lte.img.tar

SR1-SuperSU-v2.78-SR1-20160915123031.zip

FULL STEPS TO ROOT S7 EDGE


You can follow this video by me above i you want


Otherwise, follow these instructions:

  1. In your ROM, go to Settings -> About device. Tap 7 times on Build number to enable Developer options.
  2. Now go to Settings -> Developer options. (above About device)
    You need to enable OEM unlock, otherwise you might end up with boot problems or be unable to flash later on.
  3. Extract Odin_3.12.3.zip to your computer.
  4. Install Samsung Mobile Phone Drivers for Odin to find your device.
  5. Download a .tar image of TWRP for hero2lte.
  6. Reboot your device into Download mode. To do this, select reboot from the power menu and hold the [Volume Down] + [Home] buttons while your device reboots.
    Once you reach the Download mode warning screen, press [Volume Up] to continue.

  7. Open Odin and place that TWRP tar file in the [AP] slot and disable Auto-Reboot, then press [Start].

  8. Hold [Volume Down] + [Home] + [Power] to get out of Download mode and immediately swap to [Volume Up] when the screen blanks.
    If you don't see then TWRP boot splash try again from step 6.
  9. At this point, you will reach the screen asking you if you want to allow system modifications.
    By swiping right, you will trigger dm-verity, and if you don't follow step 11 you will be unable to boot!
    If you are going to root your device and follow the rest of these steps, then it is safe to swipe right and enable modifications.
  10. Only if you want internal storage or data to work in TWRP:
    Go to [Wipe] -> [Format Data] (not advanced wipe) -> type "yes".
    WARNING: This will wipe your internal storage, disable encryption, and factory reset your phone!
    Go to [Reboot] -> [Recovery].

  1. If you want to be rooted with SuperSU:
    Download the latest SuperSU by Chainfire.
    Without exiting TWRP, transfer the SuperSU zip to your device over MTP* and flash it using [Install] in TWRP.

    If you only want a bootable system partition or writable data in TWRP:
    Download the latest dm-verity and force encryption disabler zip.
    Without exiting TWRP, transfer the no-verity-opt-encrypt zip to your device over MTP* and flash it using [Install] in TWRP.
  2. Go to [Reboot] -> [System].
  3. Wait 2-5 minutes for your device to finish setting itself up.
Steps Taken from Xda thread!

Sunday 9 October 2016

How To add Gadget inside Blogger Blog Header for Any Stuff

Step-1 (Default Header Layout):

Login into your blogger account and visit theLayout section of your blog to see the header position whether it is single or has already been divided. Here is screenshot for the default blogger blog header.
If your blog contains only one column in header section as above, then follow the next steps to divided it into two parts.

Step-2 (Template Editor):

Go to the Template section of your blog and click on Edit HTML text button next to the Customize button. See the screenshot for template Edit HTML button.

Step-3 (Edit Template):

Click on Jump to widget from the top drop down menu and select Header1 as shown in this screenshot.

Step-4 (Delete Default Header Section):

You will see codes which represents default blogger blog header section.

Now, delete all these codes so that the older header section will be deleted.

Step-5 (Insert New Header Section):

Copy and paste these HTML codes in place of old header section deleted codes as shown in this screenshot.
  1. <!-- SWT Header Section START --><div class='region-inner swt-header-inner'>
  2. <b:section class='header-left' id='header-left' maxwidgets='1' name='Header-Left' showaddelement='yes'/>
  3. <b:section class='header-right' id='header-right' maxwidgets='1' name='Header-Right' showaddelement='yes'/>
  4. </div><!-- HELP: http://www.superwebtricks.com/display-adsense-in-blog-header -->
Don’t delete the HELP URL address from the last line of above code as it may help you in future for any updated tutorial and code upgradation.

Step-6 (CSS for New Header Section):

Now, press Ctrl + F for search the ]]></b:skin> and paste the following CSS codes above/before it.
  1. .swt-header-inner { /* HELP: http://www.superwebtricks.com/?p=570 */
  2. width: 100%; display: flex;
  3. }
  4. .header-left {
  5. width:50%;
  6. margin:0;
  7. padding: 0;
  8. float:left;
  9. overflow:hidden;
  10. }
  11. .header-right {
  12. width:50%;
  13. margin:0;
  14. padding: 0;
  15. float:right;
  16. overflow:hidden;
  17. /* Blog Header inserted by www.superwebtricks.com */}
See the screenshot here.
Now, click on Save Template to save the all avobe steps in your blog template.
Customization: You may adjust the width of Header-Left and Header-Right section in accordance with the title/logo of your blog or the size of AdSense Ads to be displayed.
You may also specify the width in pixel instead of percentage. Suppose you want to show your blog LOGO (70px) on the left side and insert AdSense codes (728px) on the right side in header section. Replace the CSS codes of header-left width:70px;and header-right width:730px; depending of your blog layout width (800px).

Step-7 (Insert New Gadget):

Navigate the layout section of your blog to see the difference. Here is the screenshot.T

How To Play Local Video in VideoView Android Studio-Java

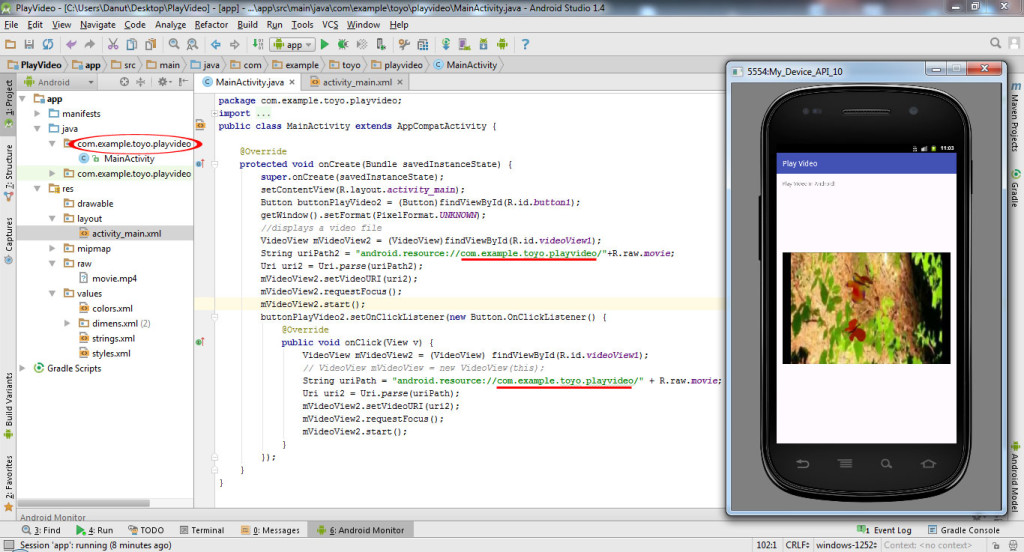
Learn from this tutorial how to Play mp4 Movie using VideoView in Android Studio version 1.4.
Create New Project with Application name “Play Video“; Minimum SDK – API 9: Android 2.3 (Gingerbread).
Create New Directory in app -> res with name “raw“.
Copy a video you want to display, in new created folder, raw; I used in this example a video with name “movie.mp4“. You can download it from here.
In file activity_main.xml, create a VideoView to display your video.
<VideoView
android:id="@+id/videoView1"
android:layout_width="wrap_content"
android:layout_height="wrap_content"
android:layout_centerVertical="true"
android:layout_centerHorizontal="true" />
In file activity_main.xml, create a transparent Button to play again video, on click.
<Button
android:id="@+id/button1"
android:layout_width="wrap_content"
android:layout_height="wrap_content"
android:layout_centerVertical="true"
android:layout_centerHorizontal="true"
android:background="@android:color/transparent" />
Complete code in MainActivity.java (in onCreate).
Button buttonPlayVideo2 = (Button)findViewById(R.id.button1);
getWindow().setFormat(PixelFormat.UNKNOWN);
//displays a video file
VideoView mVideoView2 = (VideoView)findViewById(R.id.videoView1);
String uriPath2 = "android.resource://com.example.toyo.playvideo/"+R.raw.movie;
Uri uri2 = Uri.parse(uriPath2);
mVideoView2.setVideoURI(uri2);
mVideoView2.requestFocus();
mVideoView2.start();
buttonPlayVideo2.setOnClickListener(new Button.OnClickListener() {
@Override
public void onClick(View v) {
VideoView mVideoView2 = (VideoView) findViewById(R.id.videoView1);
// VideoView mVideoView = new VideoView(this);
String uriPath = "android.resource://com.example.toyo.playvideo/" + R.raw.movie;
Uri uri2 = Uri.parse(uriPath);
mVideoView2.setVideoURI(uri2);
mVideoView2.requestFocus();
mVideoView2.start();
}
});
how to Play Video in Android Studio 1.4
Run the app in Emulator.
Enjoy the result!
Attention: the app is working only with Video with extension mp4. If you have an .avi movie or other extension, convert it on mp4 and add video to Android project.
Watch the video tutorial to Play Video in Android Studio version 1.4:
Download app PlayVideo.apk from here and install it on your device to play video.
For further questions leave a message.